Good morning
A week or so ago on the Facebook Chat page Jane asked
"Re: chipboard
Do some of you paint it/ colour it in some way and if so how?"
so today I want to share with you six ways I change
the appearance of my chipboard to suit my layouts or cards.
Lets start with this one
The dragonfly chipboard I have used is from Memory Maze - Linda's Scribble and Butterflies
I have coated the dragonfly with glue and then sprinkled Dress My Crafts Frosted Sugar Powder all over it.
The arrow is from Memory Maze - Follow Your Dreams set. I coated it with white acrylic paint and then glue before covering it with white iridescent glitter.
The white paint certainly makes a difference to the finished look.
You could, of course, use any coloured paint under the Frosted Sugar Powder or glitter for a completely different look.
No. 2
Once again I have used a dragonfly from the Memory Maze - Linda's Scribble and Butterflies set.
This time I have given the chipboard a coat of black acrylic paint.
Once it was dry I used Uniquely Creatives Wavy Words stamp and Gold Ink
to stamp on top of the black paint.
If you liked you could add a coat of Glossy Accents or similar to give a high gloss finish to this technique.
No. 3
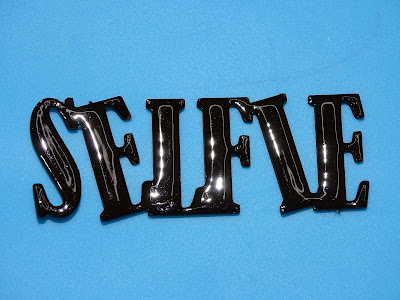
This chipboard is from Dusty Attics Mini Captions #2 set
I applied a solid cover of black acrylic paint and then a coat of Glossy Accents.
I love this technique for words and titles, it gives a high gloss domed look and
looks fantastic on top of metallic paints too.
No. 4
The chipboard for this technique comes from Memory Maze - Card Sentiments 2
I used my Versamark Ink pad and white embossing powder to colour this piece. I actually gave it two coats of embossing powder so I got that nice smooth finish to the piece.
Once again this could be done in any colour.
Very fast and simple to do.
No 5
This chipboard comes from Memory Maze - Criss Cross Hearts
I applied a coat of Deco Foil Transfer Gel Duo, let that dry and then laid a sheet of
Fab Foil in Gold on top of it and rolled over it with my brayer.
The foil did not stick to the whole surface but it has a very grunge modern look to it.
No. 6
The chipboard for this technique is from Memory Maze Wire Butterfly set.
I painted the butterfly with white acrylic paint and when it was dry I sprayed it with Glimmermist's Pumpkin Spice spray.
It has a beautiful shimmer in real life
You could also add a layer of stamping between these two layers for added interest.
So there we have 6 way you could personalise your chipboard to suit your project.
There are, of course, many many more.
I would love to hear or see your favourite ways of changing the look of your chipboard.
My process video is below.
Till next time
Stay safe
Hugs
Julie


No comments:
Post a Comment