Showing posts with label Kaisercraft. Show all posts

Friday, 18 June 2021

June Cybercrop Challenge reveal


June Cybercrop


Hi Crafters

Louise sharing for the June Cybercrop.

Your challenge is to use multiple triangles (more than one, but as many as you like).  


I started the layout as a 9x12 but added that to some black cardstock.

The washi tape was from my stash ... featuring triangles of course!

Finally I've added some triangle enamel dots.

I can't wait to see your triangle inspiration.

Happy Scrapping.


***

Good morning Julie here with my challenge to you for the June Cyber Crop.

 I would like you to create a layout inspired by this sketch.


Here is my layout


I have used Cocoa Vanilla's Daydream paper range for this layout. 
The background is White Cardstock
All of the papers have had the edges inked using a Kaisercraft ink cube, colour Bark.

I started by giving my Dusty Attic - Start Banner chipboard a coat of acrylic paint. The colour is Goldenrod which is a mustardy yellow. When the paint was dry I added a coat of the Gold glimmer pen from Uniquely Creative.

My 8" x 6" photo was matted on a piece of 8.25" x 6.25" coordinating cardstock

and Cocoa Vanilla - Daydream - Garden Variety to 5.5" x 10.75". I cut a fishtail into one of the narrower ends of the Garden Variety paper.

I tore two thin strips of the Stepping Stones paper

I have attached the papers using double sided tape and the chipboard using glue.

To embellish the layout I have fussy cut three flower clusters from the Garden Variety paper and items from the Cocoa Vanilla Daydream sticker sheet.


I used a bread & butter plate from my dinner set to draw the faux stitched partial circles above and below the patterned papers.

I also added faux stitching to all of the patterned papers, chipboard and sticker embellishments

The title was cut from the same cardstock I used to mat my photo using my Scan N Cut. I inked the edges, attached it to the bottom section of the layout and added faux stitching.

I have adjusted the sketch to accommodate my larger photo, I have added the torn paper at the top and bottom of the layout and I have also added the chipboard banner to the top of the layout. I moved the title to the bottom of the layout because it would look too cramped at the top with all of the other things I have added there. I also deleted the doily for the same reason.

Here is my process video if you would like to watch it.


Thank you for spending part of your day here with me today
Till next time
Stay safe
Hugs
Julie


Friday, 19 March 2021

March Cyber Crop


Welcome to our March CC :) 

We have 3 challenges for you, I hope you can join in!  

We chat here - Facebook Chat page

And up load our page here - Facebook Gallery Albums


Challenge 1 - Sparkle and Texture

When thinking of this month's theme, my mind when to descriptive words, and sparkle and texture came to mind, so add some to your page!!

I've added texture with texture paste and a stencil, and sparkle with Wink a Stella on all my flowers.

I've used Cocoa Vanilla's Daydream collection for my page, I adore these colours,  I fussy cut the flowers from Garden Variety paper, and layed with Sunshower.

I coloured some texture paste and used a stencil on 2 corners, then added a nice generous amount of Frosted Sugar for a bit of extra sparkle amongst my flowers! 


Hope you have fun with this challenge!
Donna

Challenge 2 - 

I am going with the "Fire" theme with this challenge

You are required to use Red, Orange & Yellow - You can use one, two, or all three of these colours plus use a stencil. I have used all three colours.

The inspiration for this layout came from a video by Allison Davis. You can see her video here.

The triangles on this layout reminded me of the Pyramids we saw while we were holding in Egypt, where this photo was taken.


 I used Modelling Paste, which I coloured with acrylic paint in Sunshine Yellow and Dusty Attics Criss Cross stencil to create a textured pattern on some orange cardstock. I am going to use this as a patterned paper on the layout

I am using some white cardstock for my background. To add a little interest I splattered Tattered Angels Chalkboard spray in Valencia all over it.

I cut an assortment of different sized squares from Simple Stories - Hello summer - Catching Rays, Simple Stories - Hello Summer - Life is Good and Kaisercraft - Native Breeze - Native Flock and the orange cardstock with the added texture paste.

To create the triangles I marked the middle of one side of each square and then cut from the two corners on the opposite edge to the centre mark. I cut approx 10 squares to begin with and placed them onto the layout leaving a thin white border between each triangle then I cut more triangles as I needed them to fill in the design and extend it out to the size I needed so the triangles were visible around each edge of the photo. Once I was happy with the placement of the triangles I inked the edges and attached them to the background using glue. I used my T-Ruler to make sure the first triangle was straight so all of the other triangles would be straight as I lined them up.

The photo measures 8" x 4.5". I matted this on white cardstock so it had a 1/16" border on all sides.

A piece of chipboard was attached to the back of the photo before it was added to the layout.

The words Sunset and Nile were cut on my Scan N Cut from black cardstock. To complete my title I used some stickers from Basic Grey.


My layout now looked like this and I had planned to stop here.

After looking at the layout for a few minutes I thought it looked a little bare so I fussy cut some of the small flowers from Simple Stories - Hello Summer - Oh Happy Day.

After looking at the layout for a few minutes I thought it looked a little bare so I fussy cut some of the small flowers from Simple Stories - Hello Summer - Oh Happy Day.

I had inked around the edges of each flower and attached them to the top left hand and the bottom right hand corners of the layout. So you can see the difference those few flowers made.

I have to admit I do prefer the layout with the flowers but the part of me that likes clean layouts is still pretty keen on the layout without the flowers


There is a process video and you can see it here.


Thank you for being here today.
Till next time
Stay safe
Hugs
Julie


Challenge 3 - 

   Hi Crafters ... Louise here. 

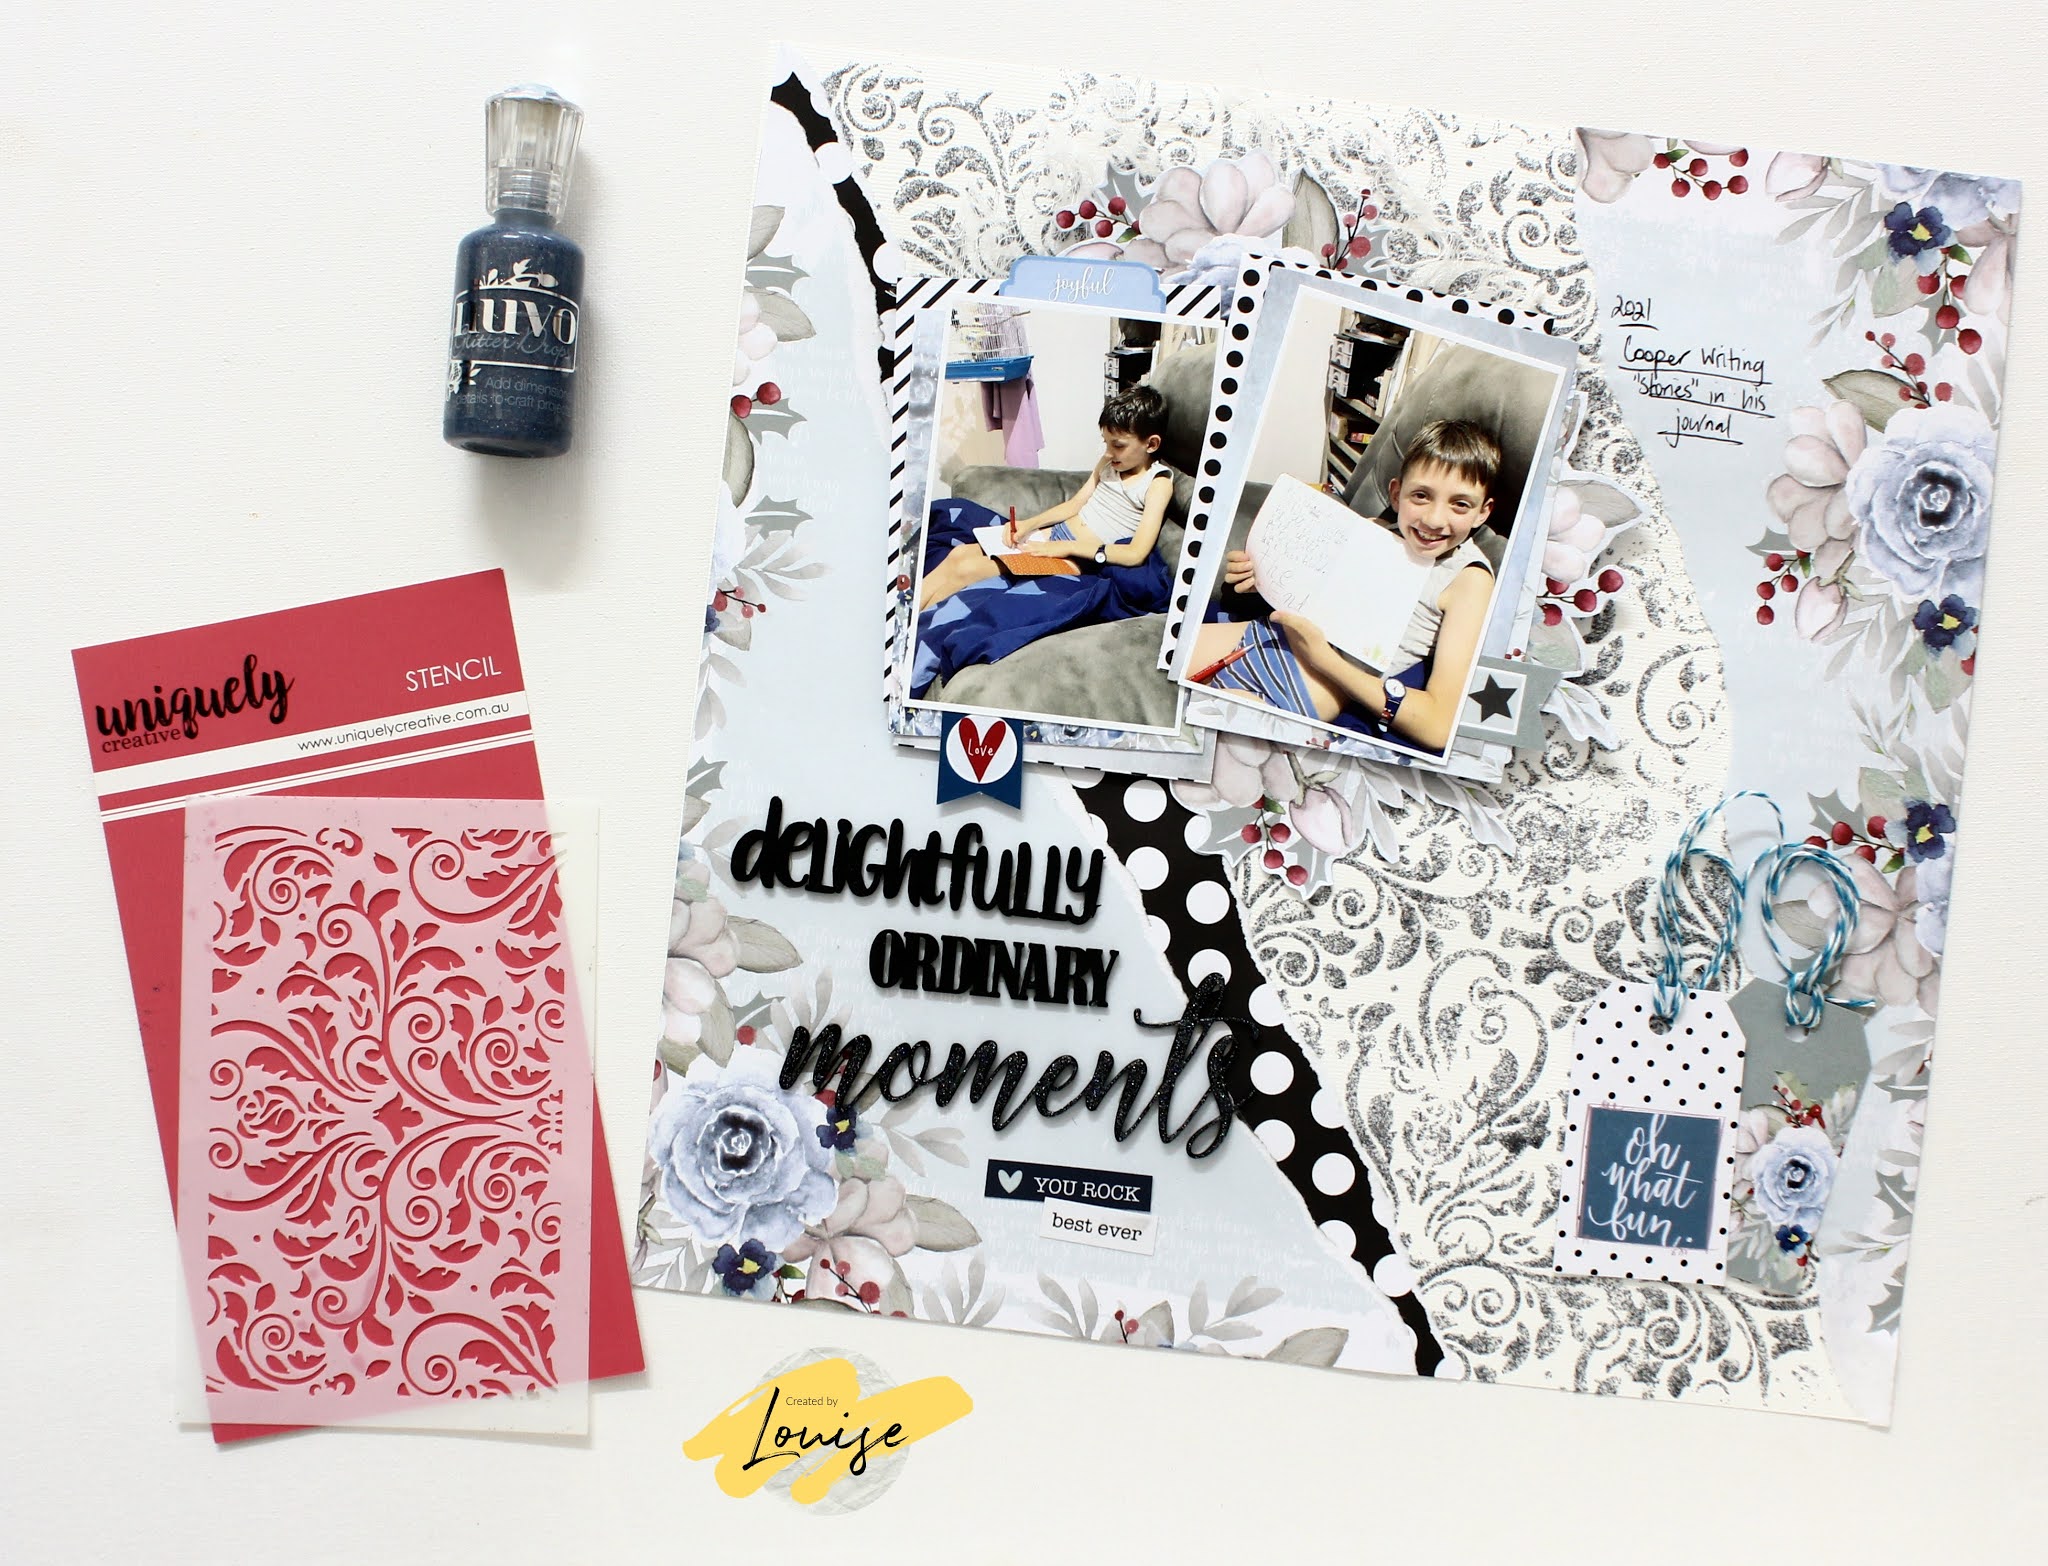
My challenge is to feature the colour blue and use a stencil.


This is my first time using the Nuvo glitter drops
I've used my spatula and applied it through the Uniquely Creative Stencil

Here are the supplies used for this layout:


I needed a title so I used the Delightfully Ordinary Moments chipboard and coated it with black

To finish I've added just a little bit of fussing cutting, some tags and cheese clothe.


Thanks for visiting ... I hope you have fun with this months challenge.

Process Video:


Happy Crafting


***

Challenge Info....

Due date Sunday, 28th March - Midnight. 

Upload your challenge entry to the albums on our Mystical Scrapbooks Facebook Chat Page.

Our chat is private, and we love to have new crafty friends join us.

We will be giving away 1 gift voucher valued at $20.00 and each entry receives 1 ticket into the draw.....So the more challenges you do the more chance you have to win!

We will also have a surprise prize!! Our DT members will choose their favourite layout and I will send that lucky person a surprise in the mail.

Happy Scrapping
Mystical DT team


Monday, 15 March 2021

Four of my Favourite Techniques to use with Stencils

Good morning

Today I have a quick post to share with you four of my favourite ways to use my stencils

There are dozens of ways to use stencils but these are the ones I enjoy and seem to use the most. I love adding texture and dimension to my projects.


I have made samplers to demonstrate these techniques. 
I cut a 12" x 12" piece of smooth white cardstock into 6" squares to use as my base. I will probably cut these up and use them on card projects in the future.

I clean my stencils as soon as I have finished each project because I do not want any of the product to dry on the stencil and make it harder to keep my stencil flat on future projects. 

To get a nice clean edge to your stencilling projects it is very important to make sure your stencil sits flat on your cardstock. 

I use a soft scrubbing brush and warm water in the sink to clean them. This could cause blockages in the plumbing if you are using your stencils continuously but I figure that for the number of time I use them I can probably get away with it. Time will tell I guess.

Starting from the left hand sample I have used Matisse Impasto Medium, which dries clear, and put that through my Kaisercraft "Textures" stencil. While the paste is still wet and in place I sprinkled Dress My Crafts Frosted Sugar Powder over it and pressed it into the medium using my brayer. The excess was tipped back into the bottle and the stencil removed. The Frosted Sugar Powder will not come off once the medium is dry as it has been firmly adhered. You could also use glitter, confetti and glass beads in the same way.

The second sample is using Colour Blast Colour Pastes through the same Kaisercraft stencil. The stencil is one of those that has 4 designs in the one 12" x 12" stencil.
This technique shows that you can use any paste with a stencil. Mostly I use Modelling Paste which I colour with acrylic paints to suit the project I am working on. Some other products that fit into the "Paste" category are Viva Inka Gold, Shimmerz Textures, Faber Castell Texture Luxe, Stencil Magic Paint Creme and BoBunny Glitter Paste, really anything that has a paste texture.

The third sample uses Deco Foil Transfer Gel Duo through Cadence MU-03 stencil.
I have applied the gel through the stencil and set it aside to dry. The gel goes on white and when it is dry it is clear. Once it is dry I laid Fab Foil, patterned side up, on top of the cardstock and ran my brayer over the foil to transfer the gold to the gel. There are lots of different colours and types of foil so the effects are unlimited really.

The final sample used Distress Oxide inks in Blueprint Sketch, Salty Ocean and Speckled Egg which I have applied through a Stencil Girl stencil using my blending brush. Once this had dried I stamped on top of the stencilling using StazOn Jet Black ink and a Kaszazz Stamp called "Reason Season Lifetime" before I removed the stencil. You could use any stamp here.

So there we have a few tips for using your stencils.

Here is the video that shows my process.


I hope you have found this informative and you try some of these techniques on your next project.
I would love to see or hear about your favourite stencil techniques. I love trying new things so leave me a comment.

Till next time
Stay safe
Hugs
Julie


Thursday, 1 October 2020

October Challenge


Welcome to our October challenges!
This month we are all about sketches.. but as always, Mystical sketches come with an additional requirement :)  

Hi everyone,

Julie here to share my October challenge with you.

The theme for the month is Sketch plus and my challenge is to use this sketch from PageMaps and the plus is to add stitching


Here is my layout.

The photos were taken on one of my walks along the River Torrens here in Adelaide. I am very lucky to live so close to the beautiful walking track that follows both sides of the river. As you can see from the central photo I have even seen Koalas on my walk. Who would think this was in the middle of a city....


There is a process video here.

I have used Kaisercraft's Native Breeze papers for this layout.

I used this sketch to create another layout in 2016. This one does not have any stitching but you might be able to draw some inspiration from it.

Good luck with this month's challenges, can't wait to see your projects.

Julie

***

 Hi Mystical fans, Louise here.

My challenge for you this month is a double layout with multi photos.

I designed this sketch so I hope you enjoy ...

This month I'm getting to play with the 

Uniquely Creative Once Upon A Christmas


I've been having such fun with the gorgeous blues in this collection and decided to team it with a pop of gold. 

Here are the supplies used for this layout:


Thanks for visiting ... I hope you have fun with the sketch.
Happy Crafting

Challenge info...

Due date Saturday, 31st October - Midnight.  Please share with your scrappy friends!

Upload your challenge entry to the Albums on our Mystical Scrapbooks Facebook.  Our chat is private and if you haven't yet joined us we'd love to have you. If you have any trouble joining please email me, Donna, with your name and or a link to your Facebook profile and I will send you an invite.

Facebook Albums - Here
Chat Page - Here

The prize is by random draw.

· International entries are welcome, however, due to international postage cost, a Creative Design Spot will be offered along with a little surprise in the post.

Australia residents, this month’s prize is a pack of Memory Maze chipboard.

Happy scrapping! 

Friday, 11 September 2020

September Cyber Crop


 Welcome to our September cyber crop...

3 challenges, over a week to complete and upload with chatting and a game of bingo over the weekend!

This month we are having fun with our paints and inks, you can achieve so much with these mediums, from a soft and subtle background to loud and fun! 

Challenge 1 - 

Hi Everyone. Louise here to share a challenge for September.

This months theme is paint and Inks.
I'd like you to create something with a "tags".

Here is my tag inspiration

"Together"


In the video below I'm showing you how to turn plain old paint into paste! 


This layout features:


This layout is very special to me. I had to let my boy go as he'd developed some health problems. This was the last photo I ever had with him.

The little strip from the bottom of the paper was perfect for recording this memory.

Thanks for visiting.
Happy Scrapping 

Challenge 2 - Stamp an image and colour it with Inks or paints

Julie here with my challenge for this month's Cyber Crop. 

I hope you will have as much fun with this challenge as I did.

I would like you to stamp an image and then colour it with either inks or paint.

It doesn't have to be a "proper" thing, ie butterfly, it can be background stamping and a colour wash for example. You may have another idea, I would love to see them.

I have stamped the butterflies on the background of my layout with StazOn ink and then used distress inks to colour them. A great way to create your own patterned paper


This video shows the complete process of creating this page including the colouring of the butterflies.

Some of the products I have used on this layout are:-

Linen Cardstock – Bridal White


Uniquely Creative Gums & Roses


Bushland Beauty


Gumnut Garden


Dusty Attic String Frames Small Chipboard


Couture Creations Eucalyptus Branch Die 


Black Soot Distress Ink


Broken China Distress Ink


Chipped Sapphire Distress Ink


Twisted Citron Distress Ink


Have a great weekend of scrapping with these three challenges.


Cheers

Julie

Challenge 3 -  Dry Brush Ink

Ink is wonderful fun and would like to see you use a dry brush to create a background.  For my page, I have used a blending brush with some Distress Oxide ink and stencil to create this detail.


I've used the very beautiful Studio 73's A Touch of Spring papers on white Linen Cardstock, and I've given the flowers with a bit of sparkle with some Wink of Stella.

You can find some more details on my blog   Have fun!
Donna


Challenge info...

Due date Sunday, 20th September - Midnight.  Please share with your scrappy friends!

Upload your challenge entry to the albums on our Mystical Scrapbooks Facebook Chat Page.

Our chat is private and if you haven't yet joined us we'd love to have you. If you have any trouble joining please email me, Donna, with your name and or a link to your Facebook profile and I will send you an invite.

We will be giving away 1 gift voucher valued at $20.00 and each entry receives 1 ticket into the draw.....So the more challenges you do the more chance you have to win!

We will also have a surprise prize!! Our DT members will choose their favourite layout and I will send that lucky person a surprise in the mail.

Happy Scrapping!

Sunday, 12 January 2020

10 Days of Christmas: Our Tree

In December life got away with me but I still had a Mystical Kit to scrap with- the stunning Kaisercraft Starry Night Collection. There are so many papers in this line that are so versatile- I definitely don't see it being limited to just Christmas. There are at least seven papers that would work well for elegant party pages, masculine stories, and boy pages. It's great to see a line with a nice navy blue, it's complimented by an off white, tan, and gold.

I decided to use the line to scrap my 2018 Christmas Photos and I've made 10 pages to share with you this month- so maybe you'll have the inspiration to get your Christmas scrapped before Valentines Day!

Saturday, 11 January 2020

Weekend Inspiration: Embellish in a box

Have you checked out our January Challenges?  


We're scrapbooking Summer this January and I used one of the new Couture Creations ranges in the store, Sunburnt Country. If you haven't seen it you should go have a look- perfect for your classic Aussie photos- travel, garden, nature, and some of your masculine pages.

 The range has these great papers with a selection of boxes on them. These are really versatile- they work while on their own as part of a linear/blocked LO. They provide a great home for your journalling. The larger ones can give you the perfect spot for a title. They can double as an extra style of patterned paper. There are bits that can be fussy cut out to add to your LO's.


My favourite way to use them as a home for embellishments- I can create something quite complex and because it's all in the box it becomes another feature on my page without overwhelming the rest of the page. Here I've combined Sunburnt Country with Kaisercraft Open Road- these two lines are a perfect partnership!


If you try this I'd love to see - please come chare it on our facebook chat page.

Monday, 23 September 2019

Quick Share: The Story Today


Supplies used: Papers: Kaisercraft Time Machine; Steam Engine, Iron Clad, Cardstock: Core'dinations Impressions; Clocks, and Aegean Mixed. Kaiser Bling: Black Rhinestones, Stickers: Kaisercraft - Acetate Stickers - Antiques, Script words, and Time Machine; 12x12. Ink: Versa color Pinecone.

Tuesday, 10 September 2019

Just In - Workshop by Kaisercraft


Workshop by Kaisercraft - Ruggedly encapsulate the gallant and fearless loved ones in your life with the Workshop Collection.  Mechanical sketches, deep blues & gunmetal greys provide a hard-working raw edge design perfect for your masculine projects.


Find it in store here - Workshop