Sunday 28 November 2021

 We have a new home and website!

Find our new blog here - News | Mystical Scrapbooks 

Which is linked to our new website here - Mystical Scrapbooks


Wednesday 1 September 2021

Sept Challenges


Welcome to our September Challenges, this month we are letting our favourite movies inspire our challenges.

Challenge 1

It may seem tricky to be inspired by a movie but here are some suggestions:


- Title
- Photo remind you of a scene from a movie
- Movie poster colours
- Good vs evil
- Romance, Comedy, Action
- Cartoons

"Hide & Seek" is a thriller movie title - I've never watched it (too scary) but I've heard about it.


So for this layout, I've used black Thickers to pop off the Nuvo background. 

The background is just freehand squiggles, dots and splatters. 

I've also used the Uniquely Creative papers.

This was lots of fun to put together and I can't wait to see your "Movie" inspiration.

Happy Scrapping.


Challenge 2 

Good morning

I am not a big movie watcher so I have decided to 
incorporate the movie theme by using a couple of film strip cut files on my layout.

I created the file on my Scan N Cut and cut it in two sizes.

The papers I have used are all from Uniquely Creative's Create your own Adventure paper range.


The background paper is "Find Your Way"

I have used Modelling Paste through TCW stencil "Chevron" in three areas of the background.

I applied Nuvo Drops  - Glitter Drops in "White Blizzard" which I had watered down slightly, with a sponge over the Modelling Paste once it had dried.

Gold splatters were added to the background using a mix of Tattered Angels Glimmer Mist in "Gold" and Artiste Spritzing Ink in "Gold"

All of the embellishments on the page were cut from 
I also used a couple of branding strips.

I cut a section on the right hand edge of the layout away and replaced it with a piece of branding strip.

The small squares that run down both edges of the large film strip were backed with a strip of black cardstock.

The edges of the small filmstrip were coloured black using a pen. The squares in this embellishment also hold the journalling for this page.

The photos were trimmed to 3 1/2" square and attached to the back of the large film strip cut file.

A strip of black cardstock and another of the branding strips were layered 
on each other and attached to the left hand edge of the layout.


Everything was attached to the page using Art Glitter Glue. 
The "Enjoy the Journey" journalling card and the small film strip 
were mounted on chipboard before being added to the layout.

The title was cut from black cardstock using Kaisercraft's "Alphabet Upper Case" dies.
Once they had been attached to the layout I coated them with the same Nuvo Drops I used on the background.


Here is the process video if you would like to watch this layout come together.


Hope you get to spend some time in your craft space soon

Stay safe
Hugs
Julie

Challenge Rules
Please upload your entries to the album in our Private Facebook Chat Group by 11.55pm, 30th September 2021 to be eligible for the prize.

Facebook Albums - Here
Chat Page - Here

The prize is by random draw.  This month's prize is a Cocoa Vanilla Kit, a mix of 12x12 papers, cardstock and embellishments.

· International entries are welcome, however, due to international postage cost, the prize is a little surprise in the post.


Monday 23 August 2021

Techniques to use on chipboard

Good morning

A week or so ago on the Facebook Chat page Jane asked 

"Re: chipboard 
Do some of you paint it/ colour it in some way and if so how?" 

so today I want to share with you six ways I change
 the appearance of my chipboard to suit my layouts or cards.


Lets start with this one


The dragonfly chipboard I have used is from Memory Maze - Linda's Scribble and Butterflies
I have coated the dragonfly with glue and then sprinkled Dress My Crafts Frosted Sugar Powder all over it.
The arrow is from Memory Maze - Follow Your Dreams set. I coated it with white acrylic paint and then glue before covering it with white iridescent glitter.
The white paint certainly makes a difference to the finished look.

You could, of course, use any coloured paint under the Frosted Sugar Powder or glitter for a completely different look.

No. 2


Once again I have used a dragonfly from the Memory Maze - Linda's Scribble and Butterflies set.
This time I have given the chipboard a coat of black acrylic paint.
Once it was dry I used Uniquely Creatives Wavy Words stamp and Gold Ink
to stamp on top of the black paint.
If you liked you could add a coat of Glossy Accents or similar to give a high gloss finish to this technique.

No. 3


This chipboard is from Dusty Attics Mini Captions #2 set
I applied a solid cover of black acrylic paint and then a coat of Glossy Accents.

I love this technique for words and titles, it gives a high gloss domed look and 
looks fantastic on top of metallic paints too.

No. 4


The chipboard for this technique comes from Memory Maze - Card Sentiments 2

I used my Versamark Ink pad and white embossing powder to colour this piece. I actually gave it two coats of embossing powder so I got that nice smooth finish to the piece.
Once again this could be done in any colour.
Very fast and simple to do.

No 5


This chipboard comes from Memory Maze - Criss Cross Hearts

I applied a coat of Deco Foil Transfer Gel Duo, let that dry and then laid a sheet of 
Fab Foil in Gold on top of it and rolled over it with my brayer.

The foil did not stick to the whole surface but it has a very grunge modern look to it.

No. 6


The chipboard for this technique is from Memory Maze Wire Butterfly set.

I painted the butterfly with white acrylic paint and when it was dry I sprayed it with Glimmermist's Pumpkin Spice spray.

It has a beautiful shimmer in real life 

You could also add a layer of stamping between these two layers for added interest.

So there we have 6 way you could personalise your chipboard to suit your project. 
There are, of course, many many more.
I would love to hear or see your favourite ways of changing the look of your chipboard.

My process video is below.


Till next time
Stay safe
Hugs
Julie

Friday 13 August 2021

August Sketchy Cyber Crop


Good morning,

Julie here with my sketch for this months Cyber Crop

The product of the month is chipboard with 20% off all chipboard in the store for this month 
so it would be great to see some on your layouts.

This is the sketch.

and this is my layout.


You can see I have stuck pretty close to the sketch. 
I have used a couple of mixed media products to 
add interest to the plain white cardstock background.

The papers I have used are from the Couture Creations Peaceful Peonies Collection Pack.

To create the background I used Deco Foil Transfer Gel through Dusty Attics Criss Cross Stencil.
When this was dry I used my brayer to add Fab Foil in Gold.

I used the same stencil with Distress Ink (Victorian Velvet) and a blending brush 
to add some pink to the background.

The background was then trimmed to 11 1/2" square and attached to a 1" black cardstock frame.

I cut 2 strips of Paper No. 01, 3/4" x 12", inked the edges with black ink 
and layered them on top of two strips of black cardstock that measured 1/2" x 12".

I cut a 3" x 12" piece of Paper No. 10, inked the edges and attached a
 1/2" x 12" piece of black cardstock to each long edge.

The pink spot/black strips were then attached to the 3" panel and this assembly 
was attached to the layout background so approximately 1/2" of the
 white background cardstock showed on the left hand edge of the layout.

The Memory Maze Happiness Heart chipboard set was given a coat of white acrylic paint 
before I added a coat of the Victorian Velvet Distress Ink. 
To add interest and depth to the chipboard I also added some Picked Raspberry Distress Ink
around the edges of each piece.

All of the chipboard pieces were attached to the layout using glue.

A sprinkling of 28 Lilac Lane sequins in Velvet was added
 for a little more colour and sparkle

Here is my process video


Plenty of scope for your personal touches with this sketch, 
looking forward to seeing what you do with it
Till next time
Stay safe
Hugs
Julie

***

 Hi Crafters

Louise sharing today. Here is my cybercrop sketch with a hint of chipboard

"Picture Perfect"


I really enjoy creating in 9x12 so I'm challenging you to give it a go.

You could also adapt this sketch to 12 x 12 and still play along.


I didn't want my background to be too overwhelming so I've used a combination of white cardstock and glitter cardstock.

The squares of patterned paper are all from the Uniquely Creative "Choose your own adventure" collection

This time I've kept the chipboard simple and covered it with embossing powder. 

I love to do interesting things with chipboard.

To finish I've just added some fussy cutting, cotton and journalling. 

Can't wait to see your creations

Happy Scrapping.


Hello, for challenge 3 I have picked a PageMaps sketch...


Sadly I haven't found the time to do any creating these last few weeks, but I'm hoping I can get some done over the weekend!


Challenge Info...

Due date Sunday, 22nd August - Midnight. 

Upload your challenge entry to the albums on our Mystical Scrapbooks Facebook Chat Page.

Our chat is private, and we love to have new crafty friends join us.

We will be giving away 1 gift voucher valued at $20.00 and each entry receives 1 ticket into the draw.....So the more challenges you do the more chance you have to win!

We will also have a surprise prize!! Our DT members will choose their favourite layout and I will send that lucky person a surprise in the mail.

Happy Scrapping!

Monday 2 August 2021

August Inspiration 12x12 Scrapbook layout by Louise + process video "Friends"

 Hi Crafters

Louise sharing today. Here is a new 12x12 layout "Friends"


For this layout I've been playing with 

Uniquely Creative "Choose your own adventure" collection

These papers already have a mixed media feel so not much extra was needed - but to create some texture I've added some distressing and paper scrunching. 

To embellish I've used some CVS Flair buttons

I love to do interesting things with chipboard.

So for this "Friends" chipboard, I've firstly coated it with acrylic paint.

Then I've covered the upper part with washi tape so I can add the glitter to the bottoms part.

I cover the lower section with tacky glue then sprinkle with glitter.

Once the glitter is dry, I spray with a sealant. 

To finish, I've added a little bit of fussy cutting and some die cut pieces.

Here is the process video:


Happy creating!

Sunday 1 August 2021

August Challenges


This Month we are all about Sketches!  

Sketches are fun, and a great way to kick your mojo up a notch.  You can flip them, turn them around  or rotate them to suit your photos

Challenge 1

Hi Crafters

How is it the start of month already?

Louise here.

This month we are focusing on sketches with a side of chipboard.

"Love this Moment"


I've designed this layout and then given you this sketch to use as you are inspired.


For this layout I've been playing with 

Uniquely Creative "Choose your own adventure" collection

I also needed some colour in the background ... so I pulled out watercolours

To embellish I've used lots of Cocoa Vanilla Studio "Legendary"

and topped it off with some CVS Flair buttons

For the title, I've used the Love this Moment chipboard and treated it with acrylic paint and embossing powder.

I'm looking forward to seeing your sketch inspired layouts.

Have fun creating!

Challenge 2

Good morning

Julie here with my sketch for you for this months challenge

Don't forget there is 20% off all chipboard for this month.

Here is my sketch. I have not added any embellishments or title just the basis for the layout.

I am very interested to see the different ways you come up with to make this sketch your own.


This is how I have used the sketch
You can see I have stuck to the basic layout mostly but added my own touch with embellishments and the title.


I have used Couture Creations Peaceful Peonies Collection Pack ,  Core dinations Aegean Mixed Dots and plain pink cardstock to create this page.

All of the patterned papers and cardstock have had the edges inked using a black ink cube.

The flowers to embellish the layout were cut from Paper No 6

The photos are 2 @ 3" x 5"

Starting from the bottom level of the layout (Aegean Mixed dots cardstock) and working my way up to the photos the papers and sizes are:-

Pink Cardstock - 11 1/2" x 11 1/2"
Paper No 02 - 11" x 11"
Paper No 01 - 5 1/2" x 10"
Paper No 05 - 3" x 12" 
Paper No 10 - 7" x 8"
Photo mat - Coredinations Aegean Mixed Dots - 6 1/4" x 5 1/4"

The chipboard scribbly circle is from Memory Maze's Linda's Scribble & Butterflies set.
I have cut this in half and painted it with white acrylic paint.

I have also added a few tiny pink flowers and white buds to the embellishment cluster.

The title was cut from the Aegean cardstock using Kaisercraft's Upper Case dies and the leaves in the floral cluster were cut using Uniquely Creatives Little Leaf Die.

Here is the process video


I can't wait to see how you use this sketch to showcase your photos.

Hugs
Julie

Challenge Rules
Please upload your entries to the album in our Private Facebook Chat Group by 11.55pm, 31st August 2021 to be eligible for the prize.

Facebook Albums - Here
Chat Page - Here

The prize is by random draw.  This month's prize is an assorted Chipboard kit.


· International entries are welcome, however, due to international postage cost, the prize is a little surprise in the post.

Have fun
Mystical Team 

Monday 26 July 2021

How do you store your dies?


Today I have a question for you

Seeing as how the product of the month is dies and they are 20% off for the month I would like to know how you store your dies?

Currently I store mine in the Avery Elle storage pockets

They come in an assortment of sizes and the ones I use are, 

Extra Large - 6 3/4" x 9 3/8" (50 Pack)
Large - 5 1/2" x 7 3/8" (50 Pack)
Small - 5 1/8" x 5" (50 Pack)

I cut a piece of white cardstock that is slightly smaller than the pocket and put that inside the pocket.

I attach a piece of magnetic sheet that is large enough to hold the die/dies.

I use my label maker to add a label to the pocket.

I write on the cardstock how many pieces are in the die set so I know I have got them all when I am packing up.


I store all of my packets in clear containers.
I have made category labels to fit into the containers so I can sort my dies 
and hopefully make them easier to find.


I always try to cut one of each die when I receive it and place it in the packet.

 I use this to try for size when I am trying to decide what to use on my project.

I store any un-used die cuts from my projects in the back of the appropriate packet.


If the die set has matching stamps I store these in the back of the packet.

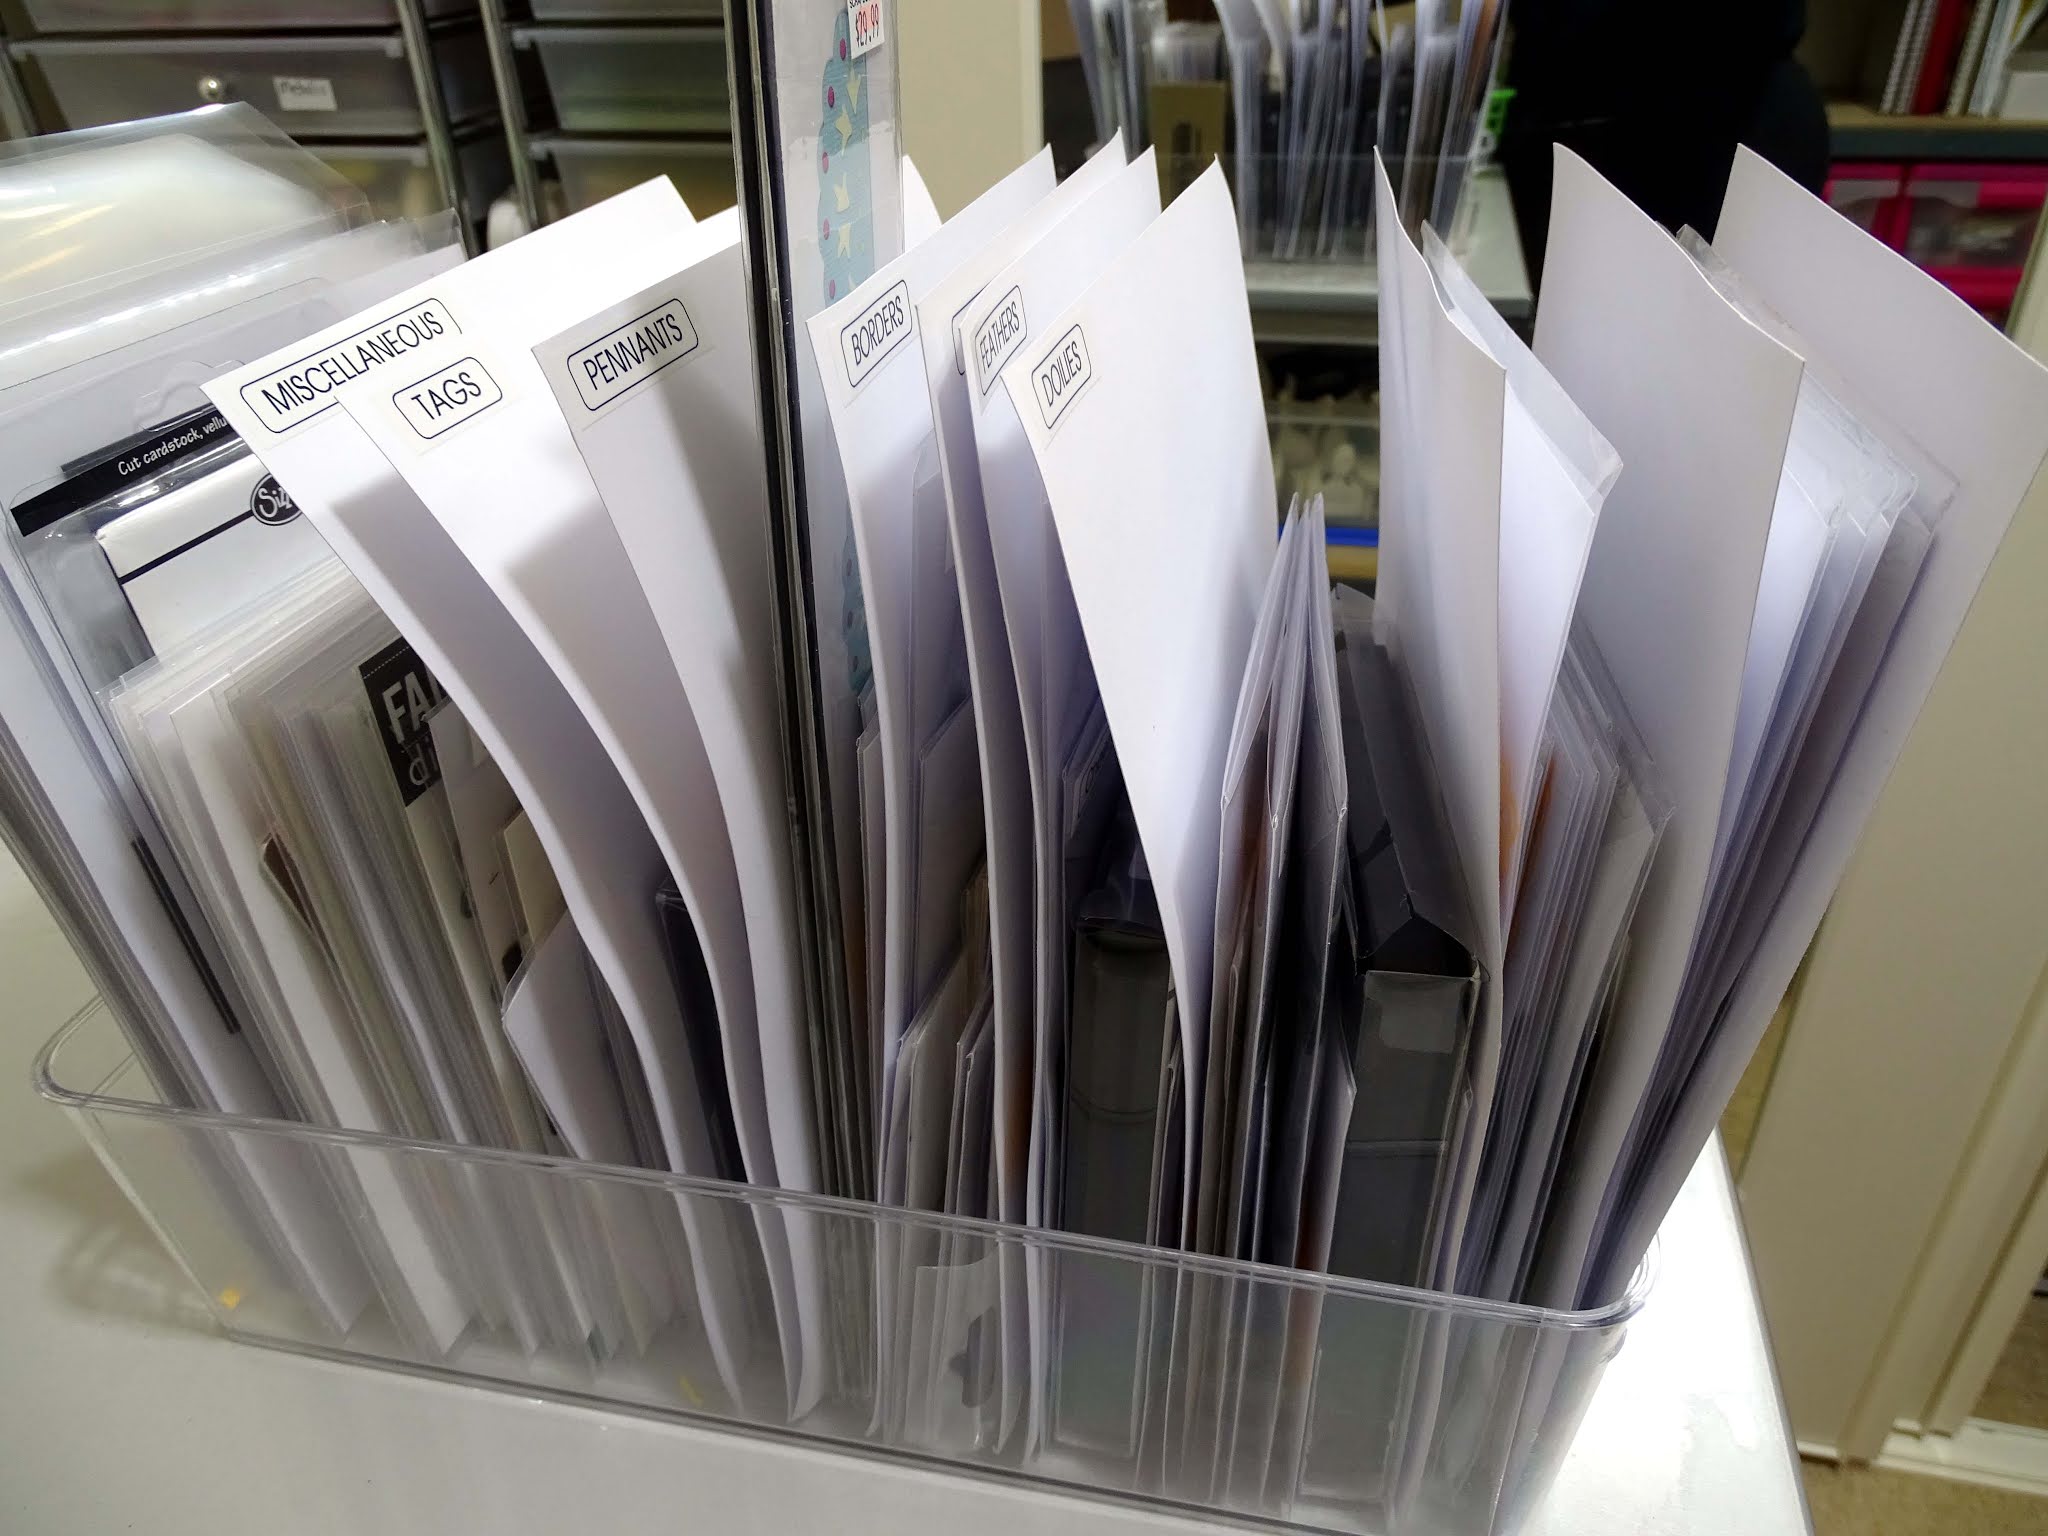
I currently store these in with my die storage but not sure whether I should keep them with my stamps. 

In fact I think I have some in the stamp storage bins and some in the die storage bins.

Perhaps they should have their own bin?

I store my stamps in the same type of bins, sorted by type.

I would love to know how you store your dies and die/stamp combinations.

Looking forward to seeing your systems
Hugs
Julie

Friday 16 July 2021

July "1-2-3" Cyber Crop


Welcome to this month's Cyber Crop!

We have 3 more challenges with the 1-2-3 requirements, you can add other items, but we need to see the required item clearly.

 Deadline is Sunday midnight 25th July.

Challenge 1

   Louise here. Sharing my challenge for 1-2-3

Your challenge is to use 


Here is my inspiration:


I'm really enjoying creating with 9x12 at the moment.

 It challenges my creativity but also I can fit a lot more pages on my shelves.

So I've started with wood paper.

Then I've added the mixed media element which is acrylic paint through the Kaisercraft Line Art stencil.

I chose some 3x4 photos and mounted them on black - to give them a little pop. 

I've used the Uniquely Creative Brick die on white cardstock, leaving it plain behind the photo and colouring it with distress ink under the "Brave" word. 

I've finished with some star embellishments and wood pieces.

Thanks for visiting

Happy Scrapping


Challenge 2

Hi Julie here with my  challenge for you for this Cyber Crop 

I would like you to use:- 

1 stencil, 
2 mediums (ie Texture paste, sprays, inks etc) 
3 colours


The feature product this month is dies and you will receive 20% of all dies in stock. 
You will find the store here so check it out.

Here is my layout


I have used two 4" x 4" photos on this layout that were taken when a group of us went cruising in November 2006.

For the background I used Ice Cold cardstock.
Using Dusty Attic's Criss Cross Stencil I applied Modelling Paste randomly around the page.
 Once that was dry I applied Watering Can Archival Ink with a blending tool through the same stencil.


I have used 
Journey
from the Collection Pack
along with 

I have cut 
The Story - Layer Cuts (reverse side) to 6" x 10"
Journey 2 @ 1 3/4" x 10" (use the reverse side for 1)
Ready?...Go! 1 1/2" x 8 1/2"
Nostalgia Cardstock 1 1/2" x 12"

I used a La La Land Scalloped Border die to die cut the scallops in the Nostalgia Cardstock

Once I had inked the edges of all of the patterned papers I attached them to the layout using double sided tape.

I then machine stitched around the page and all of the patterned papers.
I would suggest if you are going to machine stitch on your layout that you stitch each of the patterned papers before you attach them to the page. It would be so much easier.


I created a small cluster to the lower right hand area of the layout and added a few embellishments in other areas of the layout using fussy cut items from The Story - Layer Cuts sheet and a strip of the Journey paper.

I used a black fountain pen to draw faux stitching around these embellishments.


For the title I use white alpha stickers attached to a piece of the Nostalgia cardstock

The date the photos were taken was handwritten below the bottom photo.

Here is my process video


Looking forward to seeing all of your inspiring layouts for this months Cyber Crop

Till next time
Stay safe
Hugs
Julie

Challenge Info....


Due date Sunday, 25th July 2021.  Please share with your scrappy friends!

Upload your challenge entry to the albums on our Mystical Scrapbooks Facebook Chat Page.

Our chat is private and if you haven't yet joined us we'd love to have you. If you have any trouble joining please email/message me, Donna, with your name and or a link to your Facebook profile and I will send you an invite.

We will be giving away 1 gift voucher valued at $20.00 and each entry receives 1 ticket into the draw.....So the more challenges you do the more chance you have to win!

We will also have a surprise prize!! Our DT members will choose their favourite layout and I will send that lucky person a surprise in the mail.

Happy Scrapping
Mystical DT team

Monday 5 July 2021

12x12 Scrapbook layout "Family" featuring paste and acrylic paints + process video

    Hi Crafters

Louise sharing a new page with you today. 


For this layout I wanted to focus on using acrylic paints.

Sea Breeze

Marine Blue

Coastal Blue


Firstly I've used paste through stencil. Once it's dried I've used the acrylic paints with water to thin them out. 

To apply, I've used a combination of packaging technique and paintbrush to move the colours.

Choosing a photo is often a tricky part of creating.

I tried a few and settled on this one.

I've used the Family title from Cocoa Vanilla Studio.

With such a pretty background, I just had to add some florals

So I've fussy cut some Uniquely Creative paper and combined it with carnations.

Finally I've finished with just a little black stamping.


Here is the process video to see how this page came together.


Thanks for visiting

Happy Scrapping


Thursday 1 July 2021

July Challenges


Now our competition has ended for 2021, we are back to our regular challenges, and for this month we are having fun with requirement challenges.

Our DT girls have some great challenges for you.  Our challenges are open till the end of the month, have fun! 

Challenge 1 

Hi there, Julie here with my challenge for this month.

I would like you to use 

1 die set
2 photographs 
3 patterned papers

Here is my layout


As you can see I have used 

2 Photos (3" square photos of my Grand Daughter on her school sports day)
3 Patterned papers ( Ready?...Go!, Journey I have used both sides of this paper and Authorised Personnel Only.)
All of the papers are from Uniquely Creative's - Choose Your Own Adventure paper range
All of the papers on this layout have had the edges inked using Kaisercraft's Bark ink cube

To create the background I used an assortment of star stamps, that I had in my stash, to stamp randomly with StazOn Jet Black and Versa Color Cardinal Red inks.

I cut four pieces of the patterned papers so they measured 3.24" x 4", inked the edges and attached them to the page with double sided tape

I cut two of each size of the tags in the die set from Find Your Way paper as well as four of the ring reinforces in white cardstock.

I attached the ring reinforcers to the page using Art Glitter Glue.

I matted my photos onto black cardstock so they had a 1/16" border on each side.

I then used my sewing machine to stitch around the page, the patterned papers, the tags and the photos

I attached the tags to the layout, with glue, after I had threaded white crochet cotton through the holes.


The photos were mounted onto some craft foam before being added to the page.

The title was cut using my Scan N Cut from the Find Your Way paper

I fussy cut a few embellishments from The Story - Laser Cuts paper and added them to the layout

The date the photos were taken was hand written on the label at the bottom right of the layout.

If you would like to watch this layout come together here is my video


Looking forward to seeing what you create for this challenge
Hugs
Julie


Challenge 2 


  Hi Crafters

Louise here.

Your challenge is to use 3 x patterned papers, 2 word title and 1 die cut


Seems as though Julie and I have given you very similar challenges.

Here is my inspiration:

"Book Lover"


Each month we are providing a product focus and this month it's Dies.

I've used the Uniquely Creative Barbed Wire

Don't forget that dies don't have to be used for the exact description ... I've used the barbed wire cuts as the string on my tag :) 

For the background I'm using Uniquely Creative Chevron paper and cut to 8.5 x 11.

The other patterned papers used on this layout are:

Once upon a Christmas

Ocean Breeze

I chose my photo thinking about a two word title and used black thickers

I've included a die cut tag and added lots of stars.

I've created an area for my journalling at the bottom over the mesh ribbon which provides some great texture. 

To finish I've mounted it on some black cardstock.

I look forward to seeing your challenge entries.

Happy crafting.


Challenge Rules
Please upload your entries to the album in our Private Facebook Chat Group by 11.55pm, 31st July 2021 to be eligible for the prize.

Facebook Albums - Here
Chat Page - Here

The prize is by random draw.  This month's prize is a pack of Uniquely Creative lace Doilies 

· International entries are welcome, however, due to international postage cost, the prize is a little surprise in the post.